


How to Deploy Payload CMS on AWS Amplify with MongoDB Atlas for Free


Organizations frequently over-invest in hosting infrastructure for low-traffic content sites. A landing page, blog, or small CMS rarely justifies the cost of a constantly-running server—whether VPS, platform-as-a-service, or managed container services. Serverless architectures solve this by shifting from per-minute billing to per-request pricing. When traffic is very low, your infrastructure costs may approach zero.
This guide demonstrates how to deploy Payload CMS with a Next.js frontend on AWS Amplify, AWS S3, and MongoDB Atlas in a way that can stay within free-tier thresholds for a small, low-traffic site. We'll walk through the stack rationale, step-by-step provisioning, caching strategy to minimize compute, and security trade-offs you inherit.
Architecture Overview
This setup combines AWS Amplify Hosting for serverless Next.js SSR, AWS S3 for media storage, MongoDB Atlas for the database, and Payload CMS for content operations. Amplify SSR runs on AWS Lambda, so compute is billed by request and duration rather than by always-on server time; Amplify pricing currently includes 1,000 build minutes, 500,000 SSR requests, 100 GB-hours of SSR duration, 15 GB data transfer out, and 5 GB stored on CDN per month at no cost. S3 keeps uploaded media outside of your app runtime with S3 pricing, while Atlas pricing offers a free M0 cluster with 512 MB storage for small content sites.
This model is especially useful when usage is low or uneven: marketing sites with occasional campaigns, content teams publishing periodically, early-stage products validating demand, and internal tools or software services that are active only for short windows, for example one to two hours per day. In these cases, paying for permanent infrastructure often brings little business value.
If you have sustained high traffic or volatile workloads, benchmark Amplify against Vercel and self-hosted options before committing. Vercel often handles cold starts and p95 latency more predictably for SSR-heavy apps.
Prerequisites
- AWS account (sign up for 12 months of AWS Free Tier)
- GitHub repository with Next.js and Payload CMS (we will use demo repo for this tutorial)
- MongoDB Atlas free account
- Node.js 20+ and npm installed locally
Step A: MongoDB Atlas Free Cluster
Create Cluster
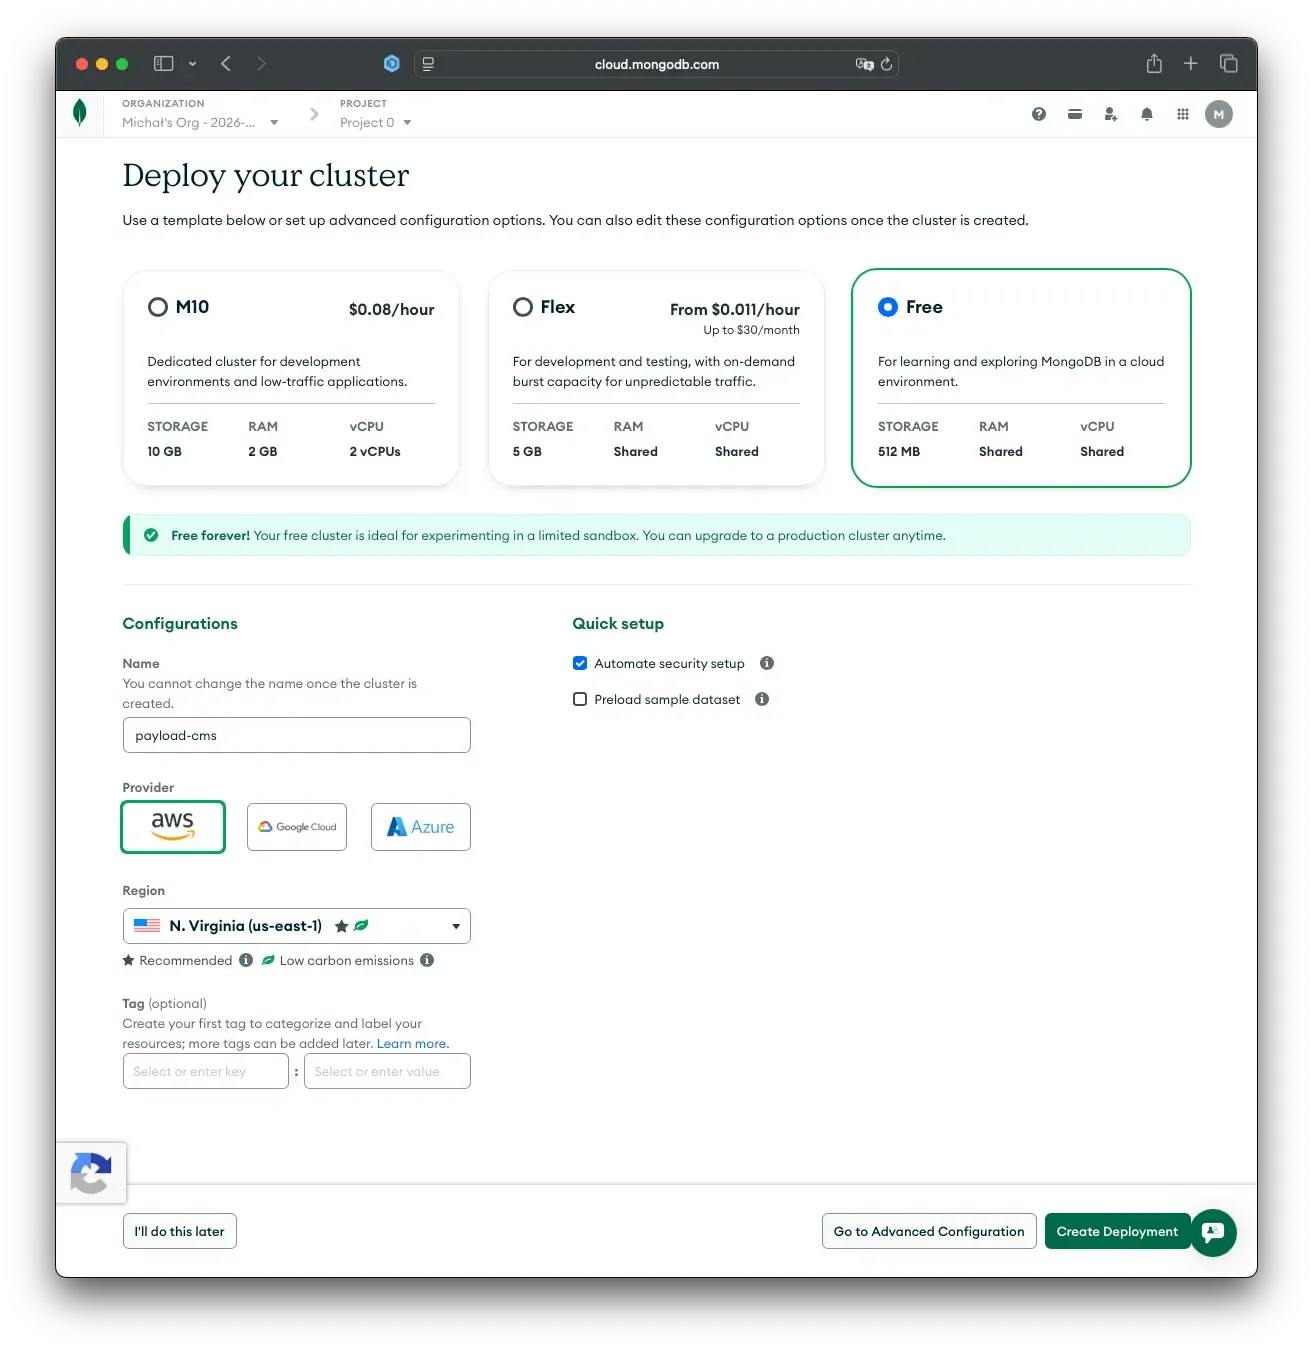
- Visit Atlas and log in.
- Click Build a Cluster and select Free tier (512 MB storage, shared vCPU, no cost).
- Choose a cloud provider and region matching your Amplify deployment (we'll use
us-east-1in AWS). - Unselect "Preload sample dataset."
- Click Create Deployment. This takes 1–3 minutes.
Create Database User and Connection String
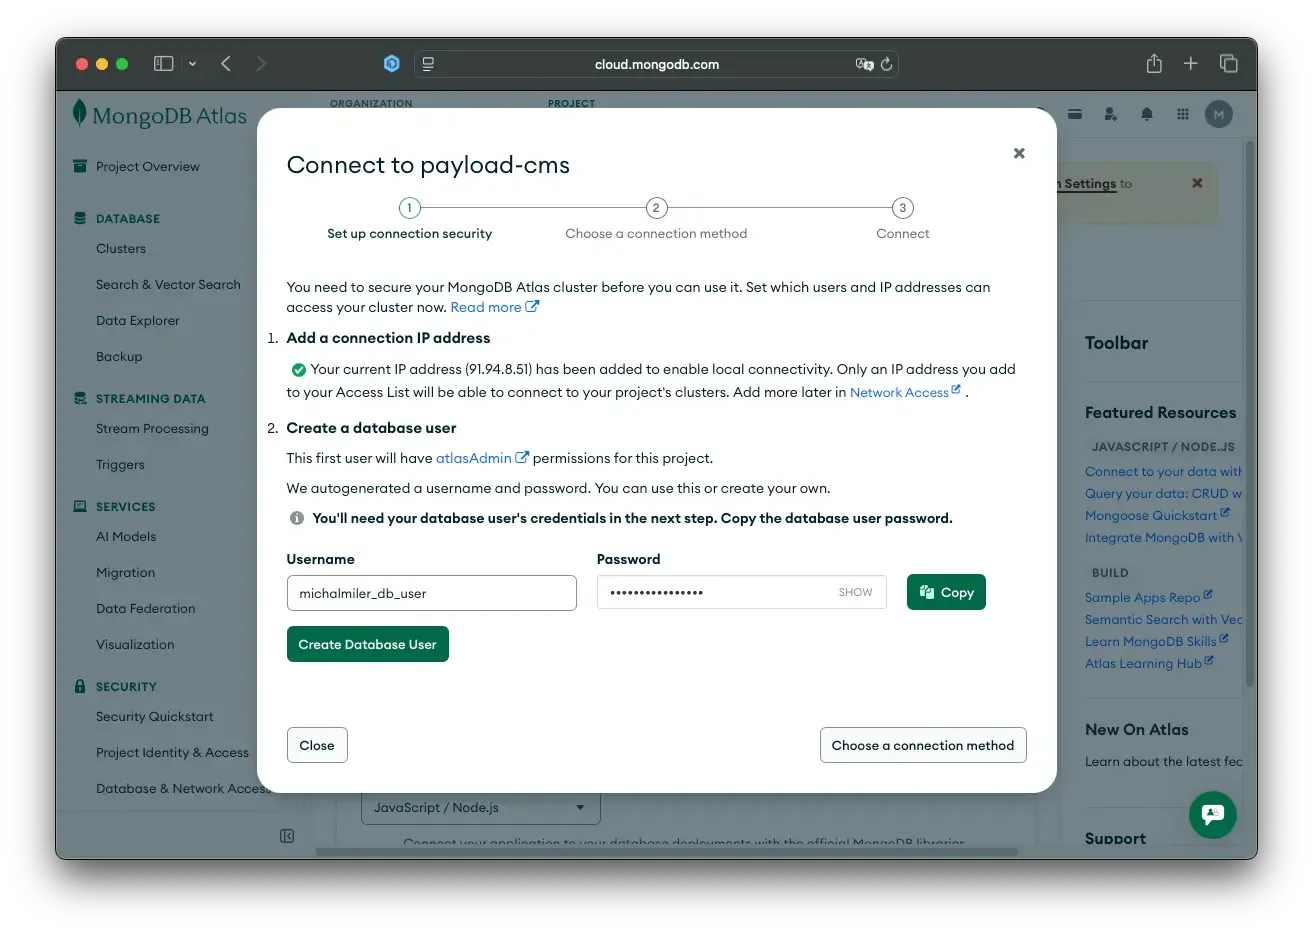
- When prompted, create a database user. Use generated password or use your own password rules; copy it immediately—you'll need it to construct the connection string.
- Click Choose a connection method and select Drivers.
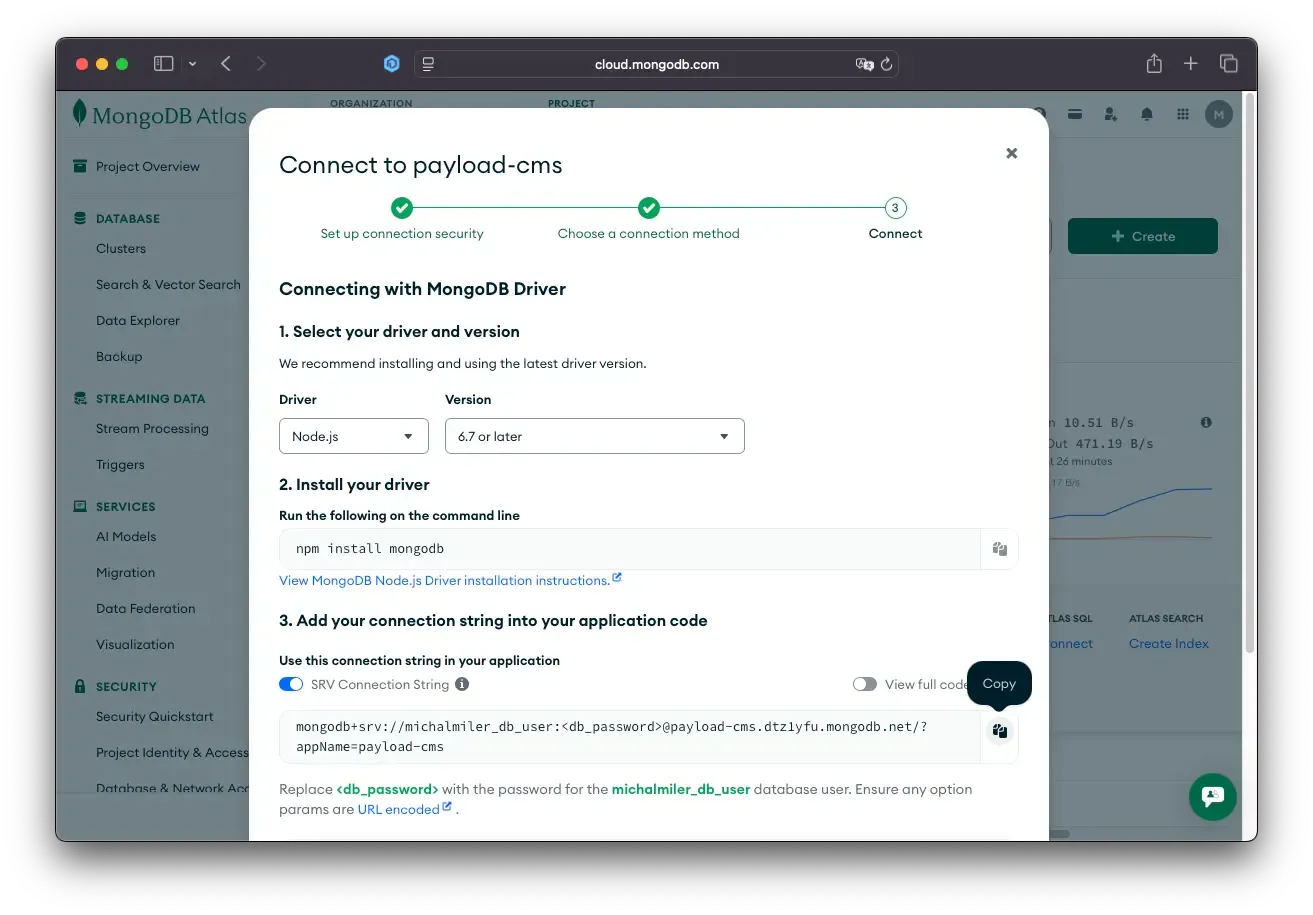
- Copy the connection string (example:
mongodb+srv://username:password@cluster.mongodb.net/?appName=payload-cms). Replace<password>with your copied password. This string includes the username; the password is separate for security. - Store this securely—you'll add it to Amplify environment variables later.
Configure Network Access
By default, Atlas limits restrict external connections. For Amplify Lambda functions to reach the database:
- Go to Security > Database & Network Access > IP Access List.
- Click Add IP Address and enter
0.0.0.0/0to allow all IPs. - Click Confirm.
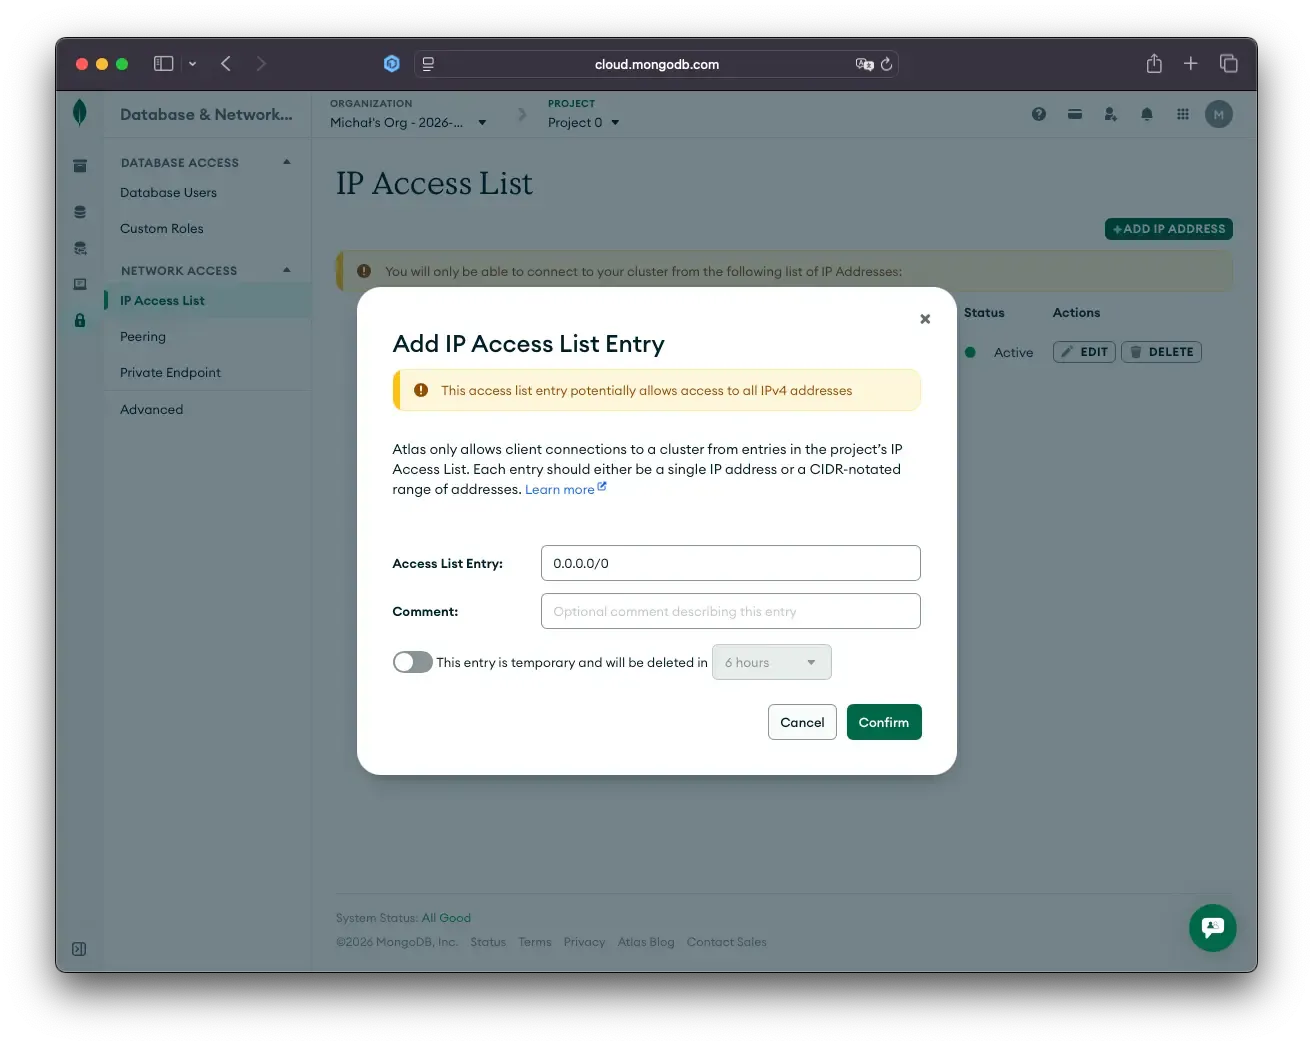
Security trade-off: This opens the database to the internet. Authentication via username/password is your primary defense. For production with higher budget, use private network options like AWS PrivateLink or VPC peering.
Your MongoDB cluster is ready. Auto-pause can add a few seconds to the first request after inactivity. In practice, proper Next.js caching usually hides most of this for end users.
Step B: AWS S3 Bucket and IAM User
Payload CMS stores file uploads (images, documents) in backend storage. Lambda limits include payload and response constraints. By uploading directly to S3 and storing S3 URLs in the database, you avoid Lambda serialization bottlenecks. For image optimization, see image guide.
Create S3 Bucket
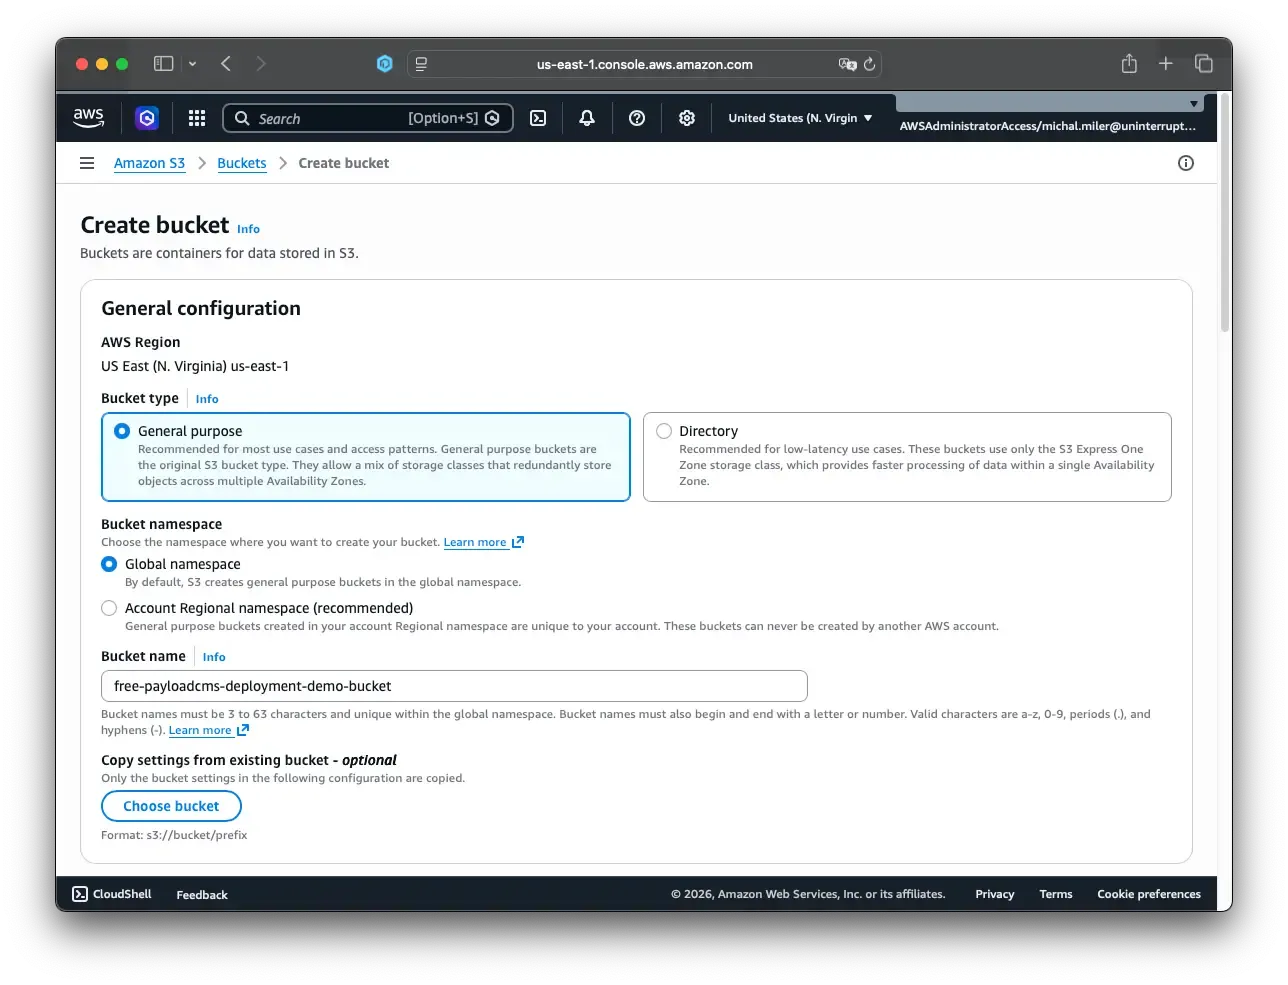
- Log into AWS Console, select the same region where Amplify will be deployed (e.g.,
us-east-1) and navigate to S3. - Click Create bucket.
- Enter a globally unique bucket name (e.g.,
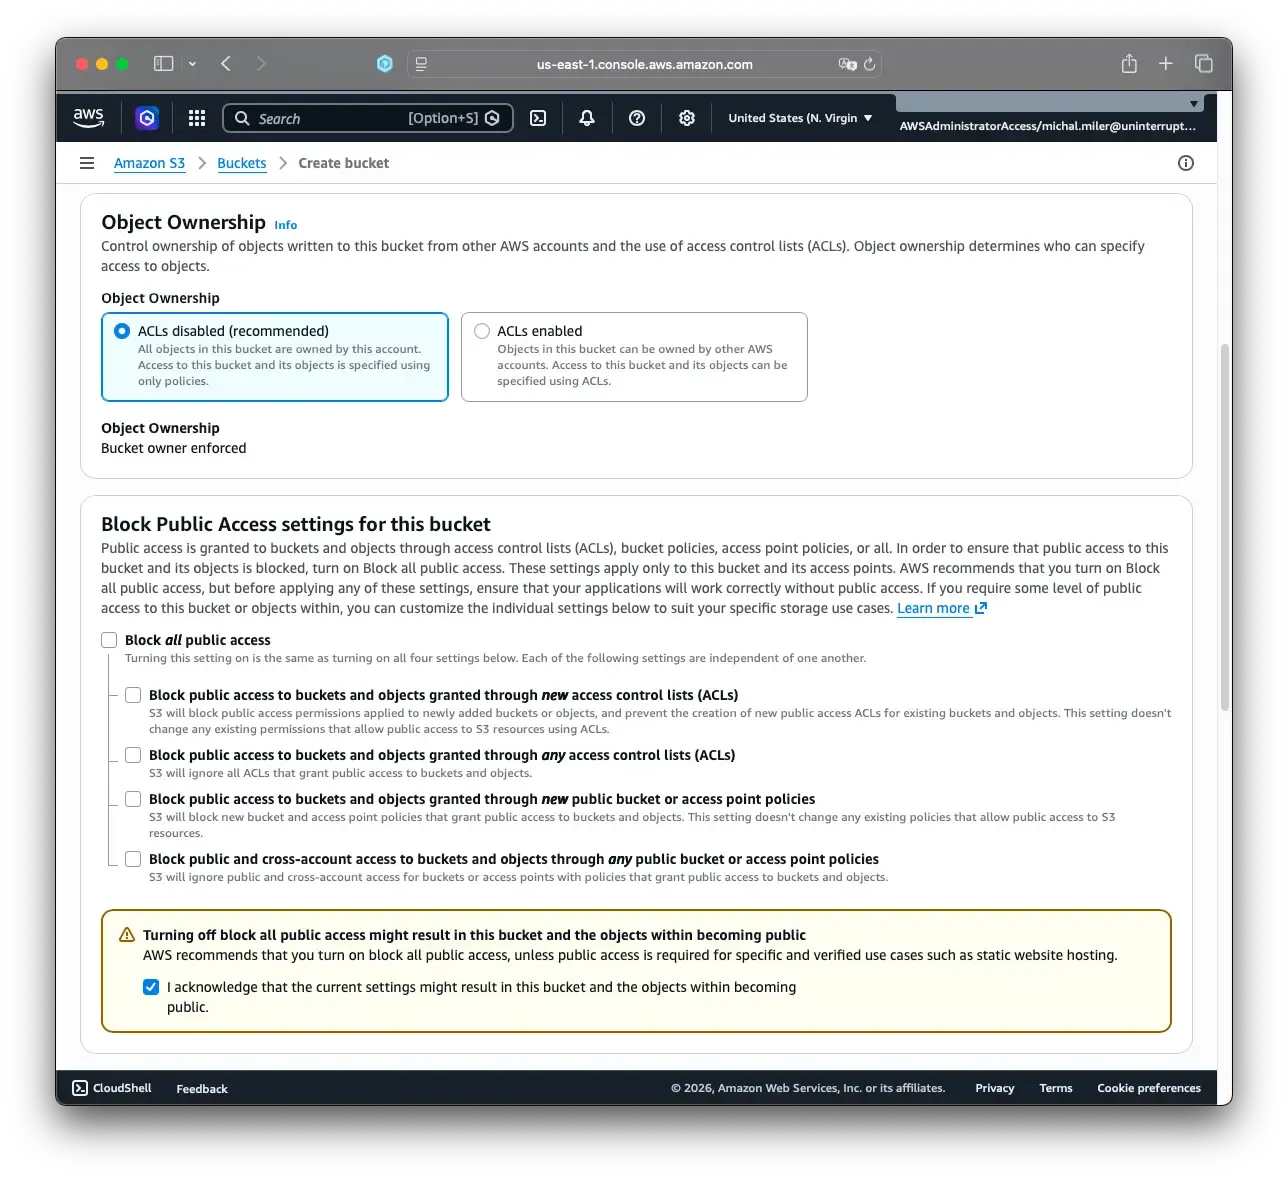
blog-payloadcms-demo-12345). - Uncheck Block all public access so Amplify and browsers can retrieve media files. Public access applies only to objects with public ACLs or bucket policies; Payload uploads are private by default.
- Accept remaining defaults and click Create bucket.
Create IAM User with S3 Permissions
Payload needs AWS credentials to upload and read media objects in your S3 bucket from the running app. Creating a dedicated IAM user gives the app programmatic access without reusing your root account and lets you limit permissions to only the S3 actions your project needs.
- Navigate to Identity and Access Management (IAM) > IAM Users.
- Click Create user and name it.
- Uncheck Provide user access to the AWS Management Console (API access only).
- Click Next.
- Select Attach policies directly and search for
AmazonS3FullAccess - Click Next and Create user.
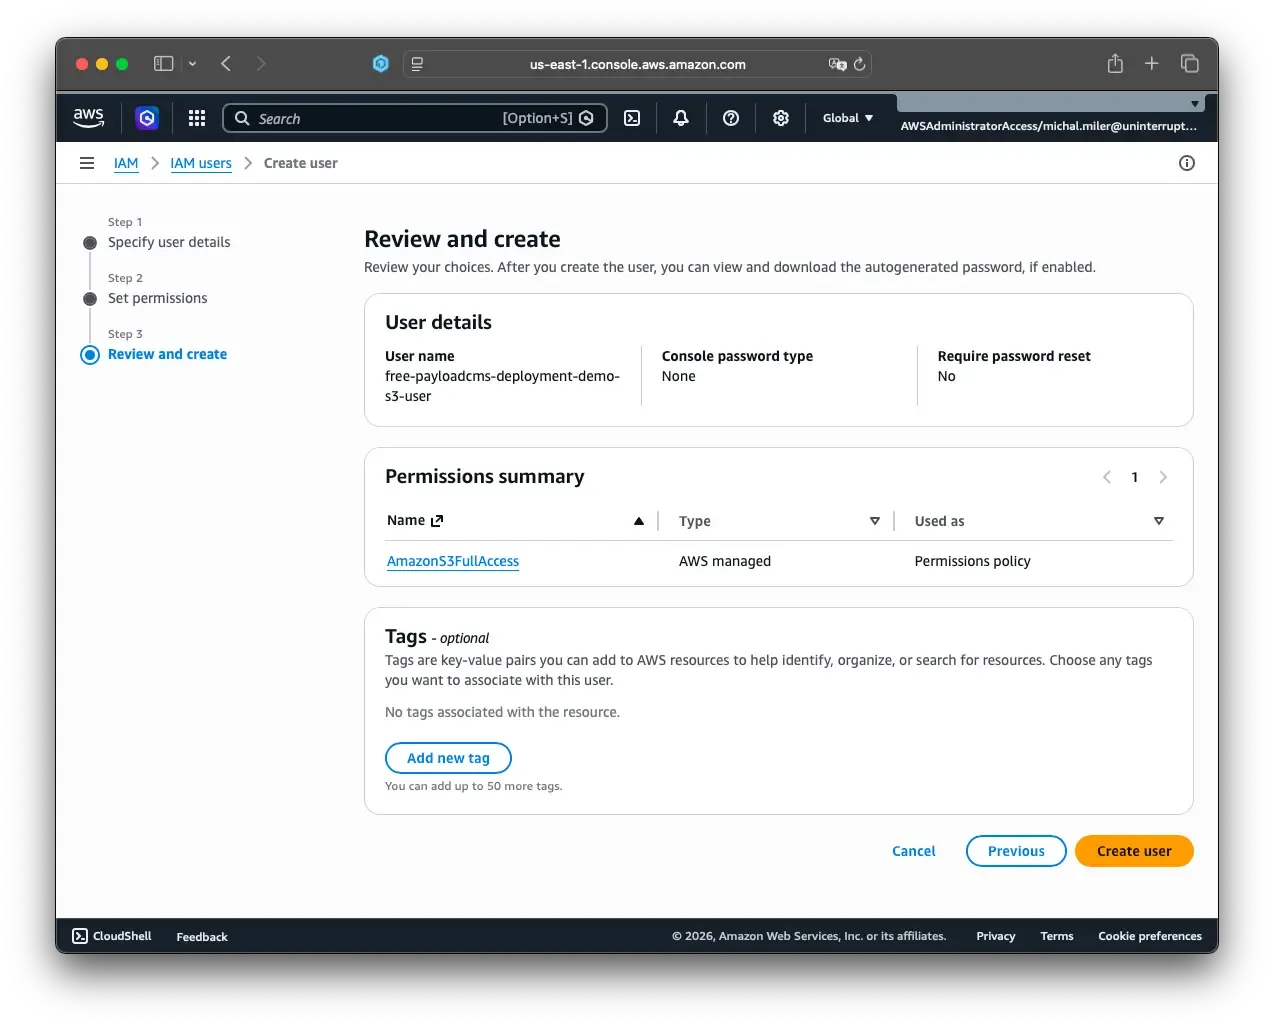
For production, follow least privilege. Create a custom policy allowing only
s3:PutObject,s3:GetObject, ands3:DeleteObjecton your specific bucket.
Generate Access Keys
- Select the new IAM user and go to Security credentials.
- Click Create access key and choose Other.
- Copy both the Access Key ID and Secret Access Key. You will not see the secret again. Store these securely (AWS Secrets Manager or a password manager). Never commit credentials to git.
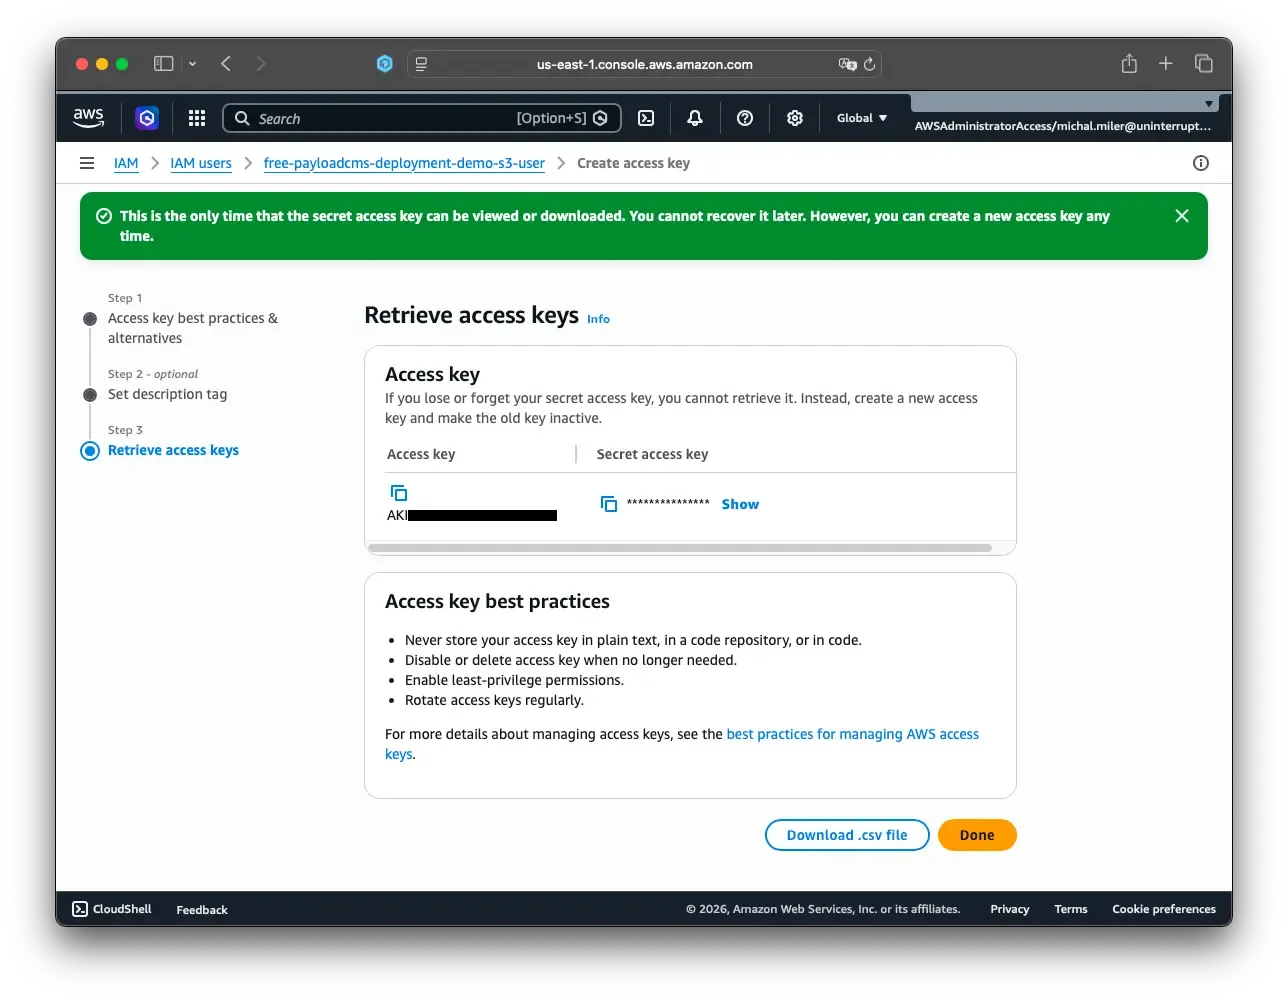
You now have all configuration data needed for S3 integration: S3_BUCKET, S3_REGION, S3_ACCESS_KEY_ID, and S3_SECRET_ACCESS_KEY.
Payload S3 config
In our demonstration repository we used the following S3 plugin configuration in src/payload.config.ts. It utilizes environment variables mentioned above and uses S3 hosting for media collection.
s3Storage({
  collections: {
    media: true,
  },
  config: {
    credentials: {
      accessKeyId: process.env.S3_ACCESS_KEY_ID || '',
      secretAccessKey: process.env.S3_SECRET_ACCESS_KEY || '',
    },
    region: process.env.S3_REGION || 'us-east-1',
    endpoint:
      process.env.S3_BUCKET && process.env.S3_REGION
        ? `https://s3.${process.env.S3_REGION}.amazonaws.com`
        : undefined,
    forcePathStyle: true,
  },
  bucket: process.env.S3_BUCKET || '',
  disableLocalStorage: true,
})
Why this setup works well on Amplify:
endpoint+forcePathStylehelps generate direct S3 URLs, which avoids routing large media responses through Lambda.disableLocalStorage: trueensures uploaded media is persisted only in S3, which is important for stateless serverless runtimes.- Keeping credentials and bucket settings in environment variables makes the same code reusable across local, staging, and production deployments.
Your configuration may differ slightly, especially around endpoint strategy, custom domains, or local fallback behavior.
Step C: AWS Amplify Deployment
Amplify Hosting is a Git-based hosting service that watches your repository, runs your build in an isolated environment, deploys generated artifacts to the CDN and compute layer, and provisions HTTPS on an *.amplifyapp.com domain.
You can configure deployment fully in the Amplify UI, but keeping the build definition in amplify.yml is usually safer for teams: it is versioned, reviewable in pull requests, reproducible across environments, and avoids silent UI drift. This is a lightweight Infrastructure as Code (IaC) approach: the deployment behavior is declared in code, not only clicked in a console. For background, see IaC guide. Build configuration lives in the repository as amplify.yml. This ensures reproducible builds across your team.
Configure Build Settings
Before creating the Amplify app, make sure amplify.yml is committed to the repository root. The file below is our configuration. Yours may differ, especially in package manager commands (npm, pnpm, yarn) and which environment variables must be exported into .env.production.
Use this as a reference and adapt only what your app actually requires:
version: 1
frontend:
  phases:
    preBuild:
      commands:
        - echo "Installing dependencies..."
        - npm ci
    build:
      # <https://docs.aws.amazon.com/amplify/latest/userguide/ssr-environment-variables.html#:~:text=Amplify%20Hosting%20supports%20adding%20environment,in%20the%20build%20commands%20section>.
      commands:
        - echo "Building the application..."
        - rm -f .env.production
        - export NEXT_PUBLIC_SERVER_URL="${NEXT_PUBLIC_SERVER_URL:-<https://$>{AWS_BRANCH}.${AWS_APP_ID}.amplifyapp.com}"
        - echo "Using NEXT_PUBLIC_SERVER_URL=$NEXT_PUBLIC_SERVER_URL"
        - env | grep -e '^NEXT_PUBLIC_' >> .env.production || true
        - env | grep -e '^DATABASE_URL=' -e '^PAYLOAD_SECRET=' -e '^CRON_SECRET=' -e '^PREVIEW_SECRET=' -e '^S3_BUCKET=' -e '^S3_REGION=' -e '^S3_ACCESS_KEY_ID=' -e '^S3_SECRET_ACCESS_KEY=' >> .env.production || true
        - npm run build
    postBuild:
      commands:
        - echo "Post build complete"
  artifacts:
    baseDirectory: .next
    files:
      - '**/*'
  cache:
    paths:
      - .next/cache/**/*
      - node_modules/**/*
The key pattern is documented in env docs: expose only required variables during build, then write them to .env.production. Keep package manager commands and env exports aligned with your own repository.
Connect Repository to Amplify
- Go to Amplify Console.
- Make sure you are in the same region where S3 bucket and Mongo Cluster were created
- Click Create new app.
- Select your Git provider (GitHub in our case) and authorize Amplify to access your repository.
- Choose your repository and the branch to deploy (typically
main). - Click Next.
Add Environment Variables
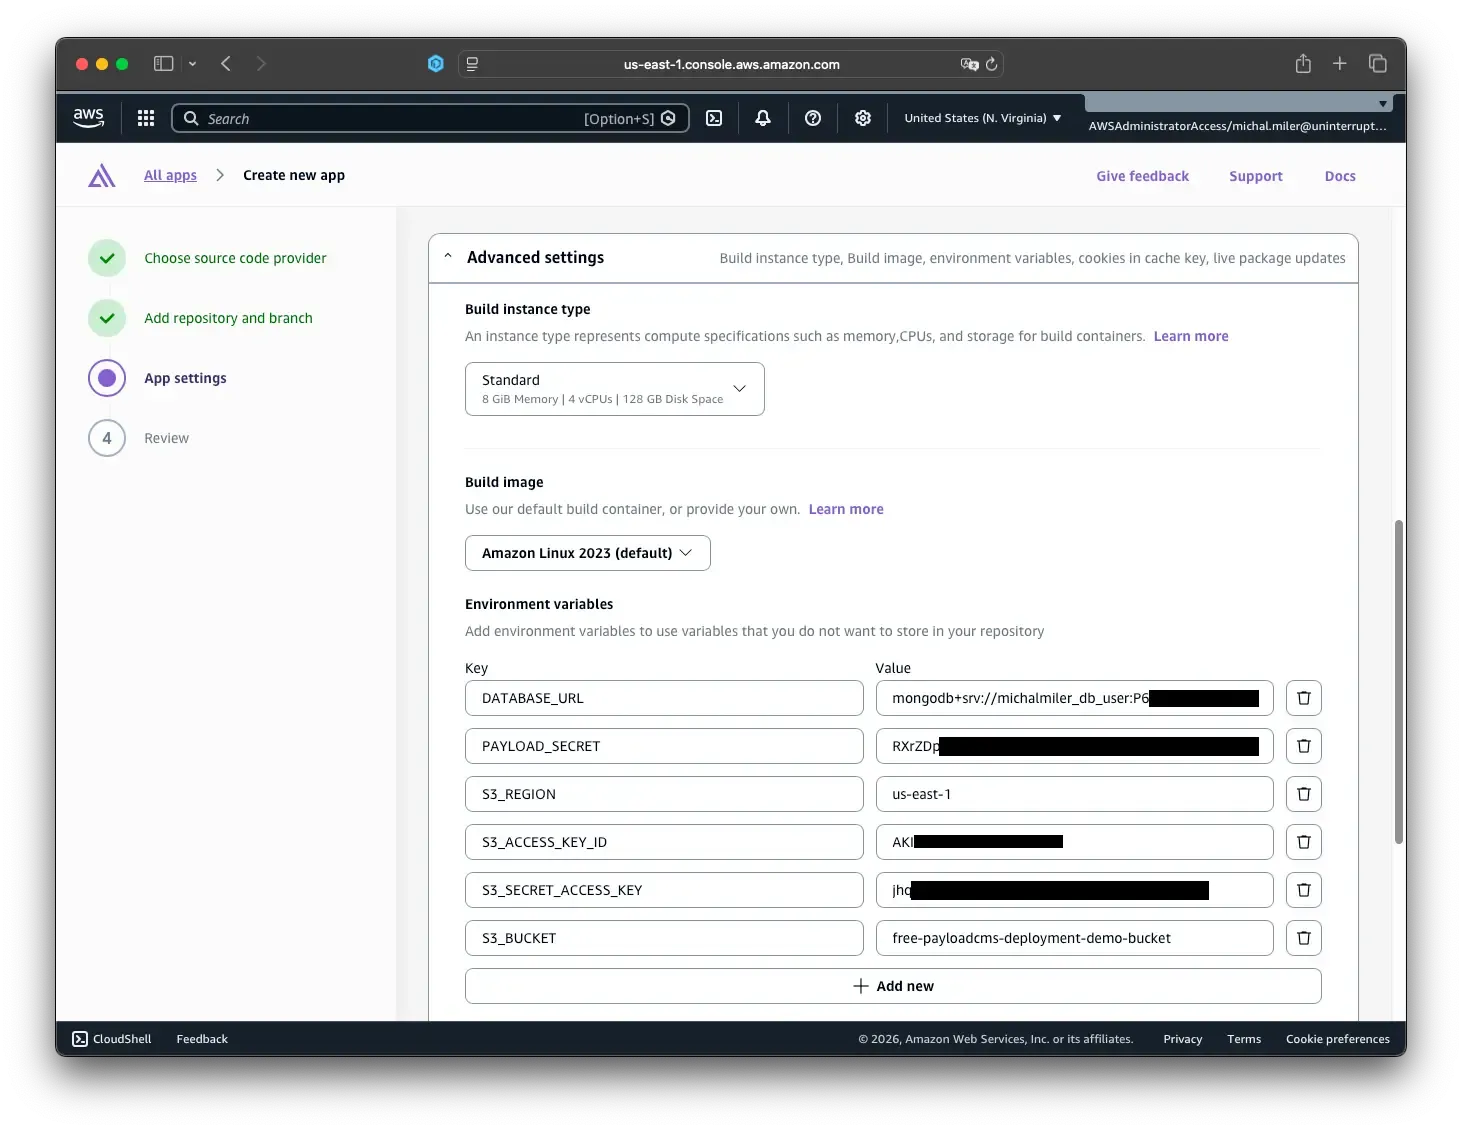
During app creation, add environment variables in step 3: App settings -> Advanced settings.
- Expand Advanced settings.
- Add the same variables shown in the screenshot (retrieved from previous steps).
- Continue deployment.
Deploy
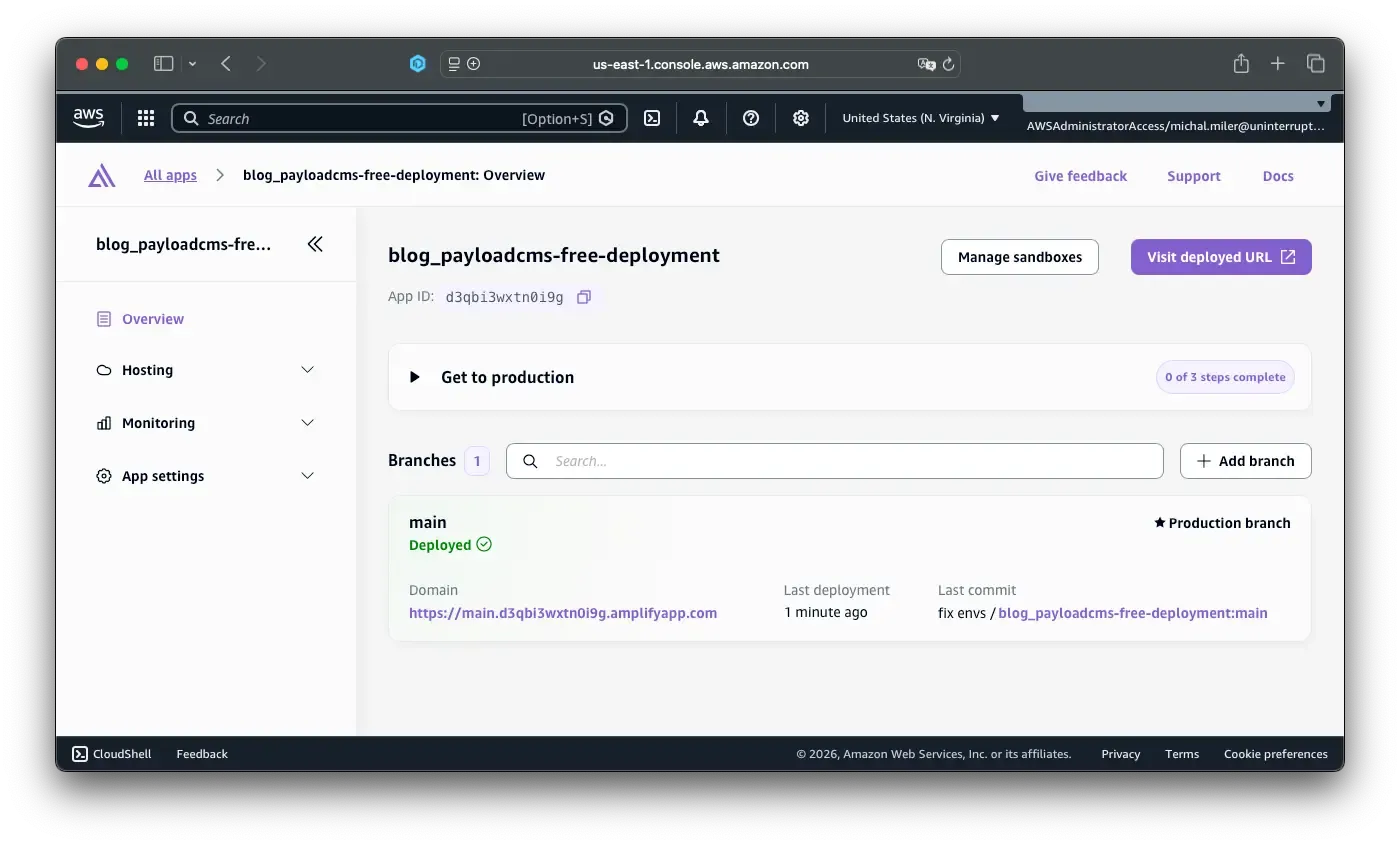
- Click Next and Save and deploy.
- Amplify now builds and deploys your app. First builds take 3–10 minutes.
- Once complete, you will see your application URL (e.g.,
https://myapp-12345.amplifyapp.com).
Verify Admin Access
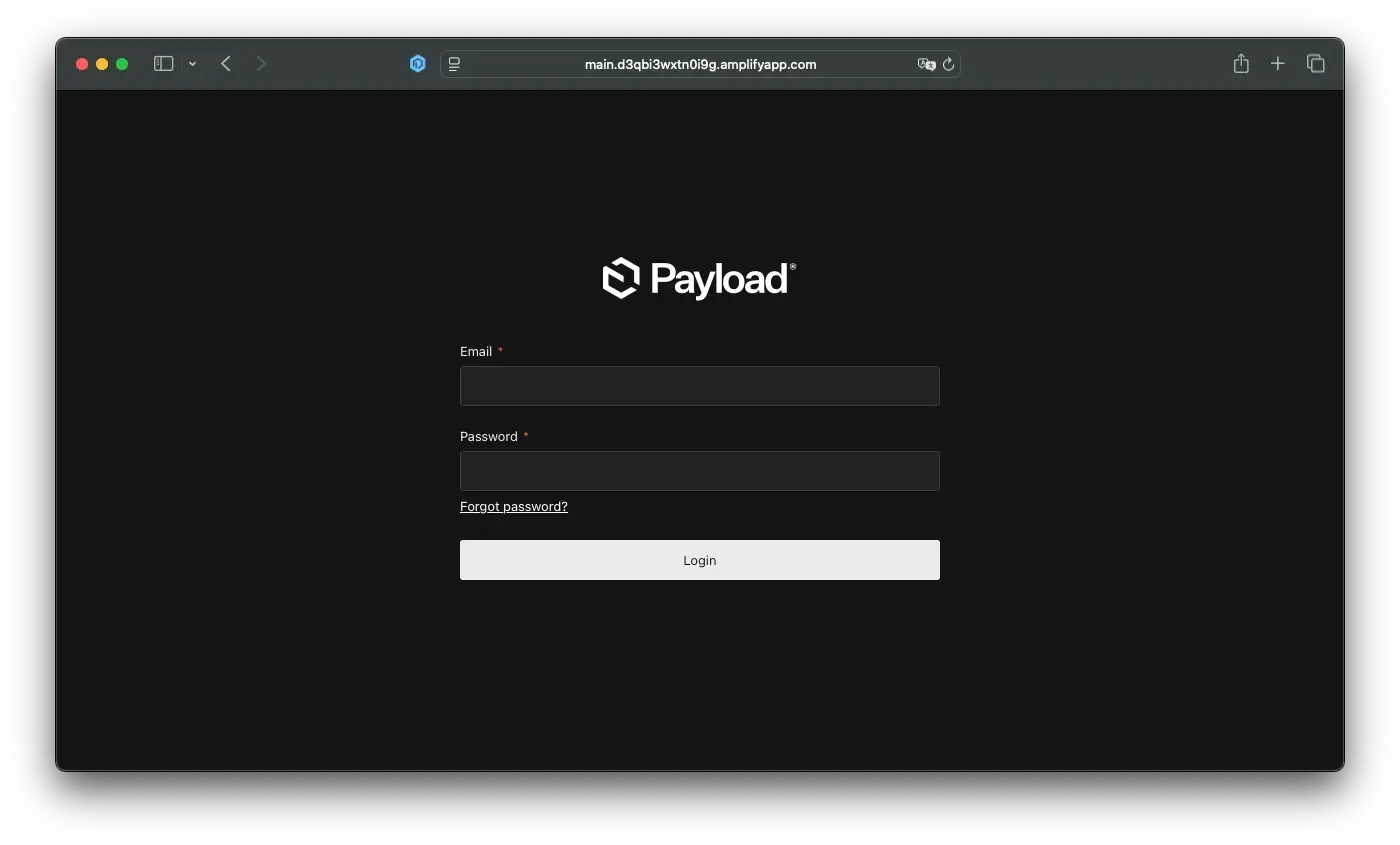
Navigate to your admin panel (e.g. https://myapp-12345.amplifyapp.com/admin). You should see the Payload login page. Use user docs to create your first admin account.
Fix Media CORS (One-Time Setup)
If images or media files fail to load with CORS errors, your S3 bucket needs CORS configuration:
- Go to S3 > Buckets and select your bucket.
- Click Permissions and scroll to Cross-origin resource sharing (CORS).
- Click Edit and paste:
[
  {
    "AllowedHeaders": ["*"],
    "AllowedMethods": ["GET", "HEAD", "PUT"],
    "AllowedOrigins": ["<https://myapp-12345.amplifyapp.com>"],
    "ExposeHeaders": ["ETag", "x-amz-request-id"],
    "MaxAgeSeconds": 3000
  }
]
Replace myapp-12345.amplifyapp.com with your actual Amplify domain. Click Save. Media should now load without errors.
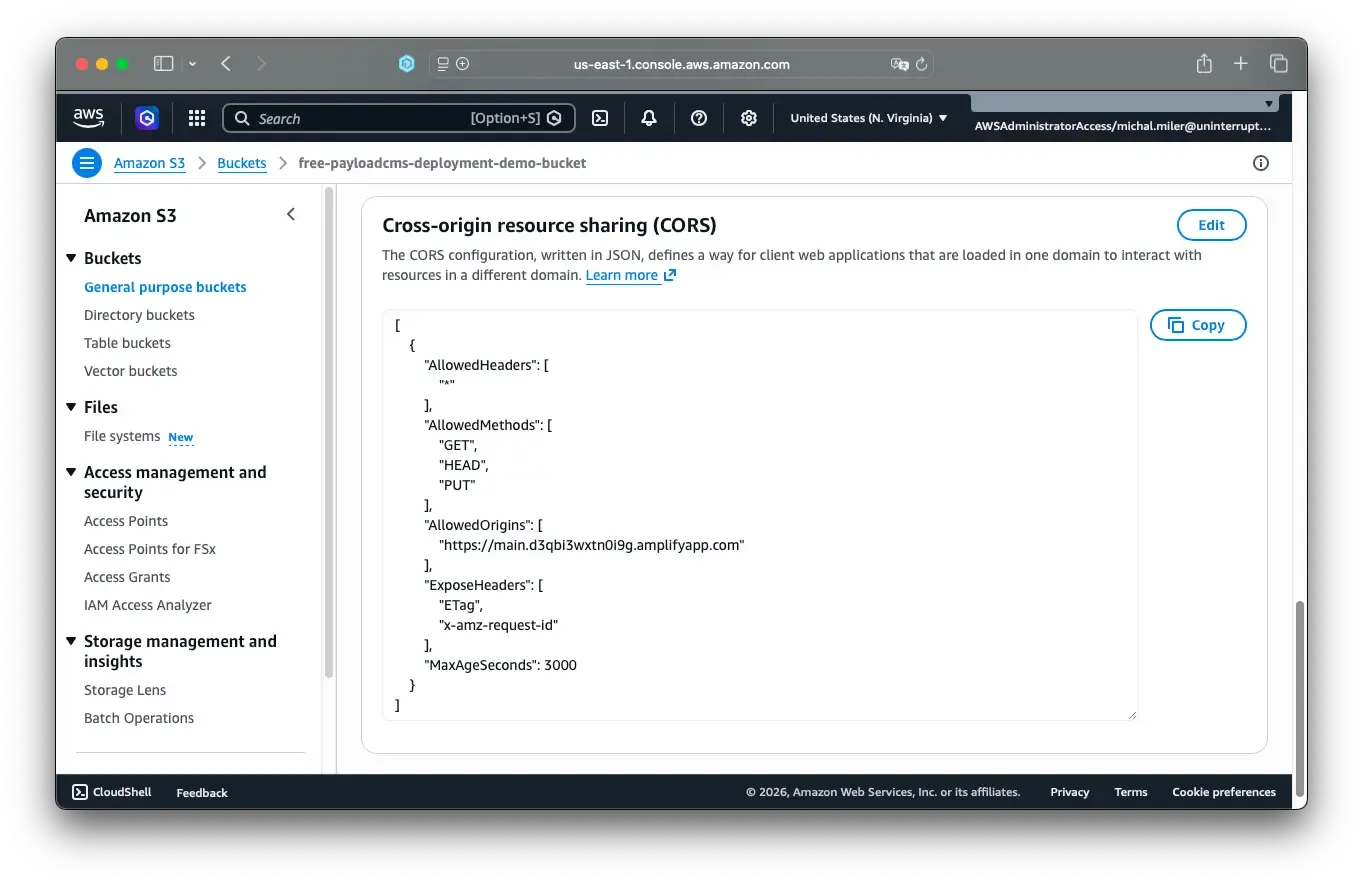
This CORS configuration allows your Amplify domain to read media from S3; it does not expose your bucket publicly.
Caching and Static Generation in Next.js
Next.js caching directly impacts Amplify compute costs. See caching docs.
Static Site Generation (SSG)
For content that changes infrequently (blog posts, landing pages), use Static Site Generation:
// app/posts/[slug]/page.tsx
export const revalidate = 86400 // Revalidate once per day (ISR)

export default async function PostPage({ params }: { params: { slug: string } }) {
  const post = await fetch(
    `${process.env.NEXT_PUBLIC_SERVER_URL}/api/posts?where[slug][equals]=${params.slug}`,
  )
  // ...
}
ISR docs explain how pages are pre-cached and revalidated in the background.
On-Demand Revalidation
When an editor publishes a new post, trigger revalidation immediately:
// `src/hooks/revalidateFrontend.ts` (Payload hook)
import { revalidateTag } from 'next/cache'

export default async function revalidateFrontend(doc) {
  if (!process.env.NEXT_PUBLIC_SERVER_URL) return

  // Tell Next.js to invalidate the blog archive page
  revalidateTag('posts-archive')

  return doc
}
revalidateTag docs cover tag invalidation across cached responses. This pattern helps keep content fresh without full rebuilds.
Cache Strategy Summary
For static pages such as landing pages and blog posts, SSG with a 24-hour ISR window minimizes compute and usually results in only periodic revalidation calls. Dynamic surfaces like search or personalized dashboards are still rendered per request, so they consume more SSR runtime. API routes can remain lightweight and use HTTP caching behavior where applicable. For low traffic, this mix typically stays inside Amplify free-tier limits.
Pricing Notes
AWS Amplify
Amplify pricing is usage-based:
- Build minutes: 1,000/month included, then $0.01 per minute
- SSR request count: 500,000/month included, then $0.30 per 1 million requests
- SSR request duration: 100 GB-hours/month included, then $0.20 per GB-hour
- Data transfer out: 15 GB/month included, then $0.15 per GB
- CDN storage: 5 GB/month included, then $0.023 per GB-month
AWS S3
S3 pricing is also usage-based. For a small media library, storage and request costs are usually low, but the exact amount depends on object size, request volume, storage class, and data transfer.
MongoDB Atlas
Atlas pricing includes the free M0 cluster: 512 MB storage, shared RAM, shared vCPU, free forever. Atlas limits also note that auto-pause can slow the first request after inactivity.
When to Reconsider
- High traffic or tail-latency sensitivity: benchmark Amplify against Vercel and self-hosted options.
- Unpredictable spikes: verify how your cache hit rate and SSR load affect request count and duration.
- Compliance or data residency: ensure your MongoDB and Amplify regions match your requirements. See AWS regions.
Security Trade-Offs
1. MongoDB IP Allowlist: Public Access
Configuring 0.0.0.0/0 means any IP can attempt to connect to your MongoDB cluster.
Use long random credentials, limit the Mongo user to the minimum database scope, and avoid admin privileges for application access. For stronger isolation in production, use network controls instead of public IP allowlists.
2. S3 Public Access: Bucket Policy and CORS
S3 blocks public access by default. Unchecking this allows you to create a public bucket policy.
Keep policies narrow: allow only public read (s3:GetObject) where needed and never expose write permissions publicly. If files are sensitive, prefer signed URLs with expiration instead of open object access; see storage docs. It also helps to separate public uploads from private objects by prefix and policy.
3. Secrets in Environment Variables
Amplify stores secrets in managed service configuration rather than in your repository. These values are encrypted at rest and should never be printed in build logs.
Keep IAM permissions minimal for deployment roles, avoid logging any secret values in build output, and consider Secrets Manager if you need managed rotation and stronger operational controls.
For a detailed security review, see security guide.
Bonus: Custom Domain Setup
Once your site is live on myapp-12345.amplifyapp.com, you can add a custom domain (e.g., blog.example.com):
- In Amplify Console: Go to Domain management and click Add domain.
- Point Route 53 DNS: If your domain is in Route 53 (AWS), Amplify auto-creates records. Otherwise, add your registrar's CNAME records.
- SSL/TLS: Amplify generates a free certificate via AWS Certificate Manager. HTTPS is automatic.
- Costs: Domain registration (~10–15/year) + Route 53 hosting (0.50/month) if applicable.
For detailed steps, see domain guide.
Troubleshooting
"502 Bad Gateway" or "413 Payload Too Large"
If media uploads fail, the issue is likely the 6 MB Lambda response limit. Ensure S3_ENDPOINT is configured in your Payload config to use direct S3 URLs, bypassing the Lambda gateway. See config file for the current setup.
"Database Connection Timeout"
Check that:
- MongoDB Atlas IP allowlist includes
0.0.0.0/0or your Amplify IP. DATABASE_URLis correct and includes the password.- Database user exists and has correct credentials.
Media Not Loading (CORS Error)
Ensure your S3 bucket CORS policy includes your Amplify domain (see CORS step).
Logs and Debugging
Use logs docs to inspect runtime errors, environment variable issues, and database connectivity problems.
Summary and Conclusions
This architecture gives you a practical way to run a Payload CMS website with low baseline cost: Amplify for SSR compute, S3 for media, and MongoDB Atlas for managed data. For low-traffic landing pages and blogs, it can stay within free-tier thresholds when caching is configured correctly and media is served directly from S3.
The key trade-off is operational behavior under low traffic: you may see cold starts and first-request latency, so monitor logs, keep SSR scope minimal, and add warming only when needed. As traffic, compliance, or latency requirements increase, benchmark against Vercel and self-hosted options before scaling the same setup.
Next Steps
Now that your site is deployed, consider:
- Optimize images: See image guide.
- Reduce cold starts: If you notice slow first loads after inactivity, use warming guide. Vercel usually hides this problem better, especially for p95 latency, so benchmark both if first-response consistency matters.
- Monitor costs: Set up AWS Budgets.
- Scale content: As you grow, plan for MongoDB upgrade to a paid cluster if storage exceeds 512 MB.
We Can Help You Scale
If your traffic grows, infrastructure becomes unstable, or you need to move between cloud providers, u11d can help. We have production experience across Vercel, AWS, DigitalOcean, and others; we specialize in cost-effective, resilient deployments. We care about your business success, not just the technology.


Frequently Asked Questions
Can I really host Payload CMS almost for free on AWS?
Yes. Low-traffic sites can often stay within the free-tier limits of AWS Amplify, S3, and MongoDB Atlas.
Is AWS Amplify good for Next.js and Payload CMS?
Yes. Amplify supports Next.js SSR and works well with Payload CMS for small and medium projects.
Why should I use S3 for media uploads?
S3 stores files outside your app runtime, improving scalability and avoiding Lambda upload limitations.
What type of websites work best with this architecture?
Blogs, landing pages, marketing websites, internal tools, and low-traffic CMS-driven sites work best.
Does this setup support custom domains and HTTPS?
Yes. AWS Amplify supports custom domains and automatically provisions SSL certificates.
Why is my site slow on the first request after inactivity?
This is usually caused by Lambda cold starts or MongoDB Atlas free cluster auto-pause behavior.
Why are my uploaded images not loading correctly?
Most image issues come from incorrect S3 bucket permissions or missing CORS configuration.
Why does my Amplify deployment work locally but fail in production?
Environment variables, Node.js versions, or build settings may differ between local and Amplify environments.
Why are my infrastructure costs increasing unexpectedly?
Excessive SSR rendering, poor caching strategy, or large media transfers often increase costs.
Why can’t my app connect to MongoDB Atlas from Amplify?
The Atlas IP allowlist or database credentials are usually misconfigured.
References
- Amplify docs
- Amplify pricing
- Amplify env
- Amplify Next.js
- S3 pricing
- AWS free tier
- Lambda pricing
- Atlas pricing
- Atlas limits
- Next.js caching
- revalidateTag
- revalidatePath
- Payload deploy
- Payload env
- IAM practices
- Domain setup
- Amplify logs


